
On this page, we would like to introduce you to Japanese Whetstones and explain how to sharpen knives with Whetstones.
We firmly believe that sharpening with Whetstones is the best way to sharpen knives and to maintain good edge geometry.
Here are a range of Instructional Sharpening Videos featuring the Great Master Nagao (President of Hiromoto Company). We hope that you will not miss the chance to learn the whetstone sharpening process and some helpful tips from this great craftsman, who has over 50 years of knife making experience!
We believe that the sharpening methods shown in these videos will help you to understand the correct sharpening motions and procedures, step by step.
2. Sharpening Wabōchō[Japanese Single Bevel Edge Knives]
3. Sharpening with Arato [Coarse Grit Whetstones]
4. How to Flatten Whetstones

Arato (Rough Grit Whetstone)

Nakato (Medium Rough Grit Whetstone)

Shiageto Fine Grit Whetstone
There are three kinds of Whet Stone. (Pictures above). Arato (Rough Grit) Nakato (Medium Rough Grit) and Siageto (Fine Grit). Each kind of Whetstone has different use for the sharpening process.
Arato (Rough Grit) has a rough surface. An Arato is useful for repairing chips, fixing a broken tip, and making an angle for a sharp blade.
Nakato (Medium Rough Grit). Sharpening with Nakato makes blade more sharp and good shape (angle) for sharp blade.
Siageto (Fine Grit) is used for finishing the process. This work is necessary for keeping a sharp blade.

First put the whetstones in water to remove air from inside them. You will see many bubbles come out of the whetstones. 5 to 10 minutes later, after the bubbles stop coming out, the whetstones are ready for sharpening.
Prepare your table it for a good height and good balance when you are sharpening. Also it is good to prepare a towel to keep the whetstones from slipping.
Many of our Whetstones ("JCK Special Combination Whetstone Grit #1000/#4000", "#6000/#10000", "Super Fine Grit #6000" and "#8000" don't need to be soaked in water before sharpening. They can be used after watering the stone surface thoroughly.)
It is important to check the edge condition before sharpening the knives.
The knife I will sharpen today is very dull. It has not been sharpened for 6 months. I begin to sharpen with an Arato. If you sharpen the knives frequently, you can begin to sharpen with Nakato.

Sharpening Angle 10' to 15' (Two coins height between the blade and the whetstone)
1.
2.
3.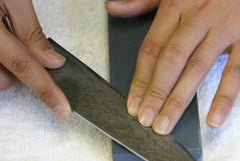
As you see in the pictures, it is always very important to keep same angle of about 10' to 15', which is about two coins height between the blade and the whetstone. Gently push the point you want to sharpen with your first, second and third fingers. While keeping the angle and pushing the point with your fingers, stroke the blade until it reaches the other edge of the whetstone. Then pull the blade back until it reaches the edge of the whetstone. This back and forth is counted as one stroke. Repeat it for about five strokes until you can see or feel some small burrs (edge curvatures). Then move the position of your fingers to where you have not sharpened yet, and repeat this five strokes of sharpening processed from the tip to the base of the blade.
Sharpening Opposite Side of Blade
1.
2.
3.
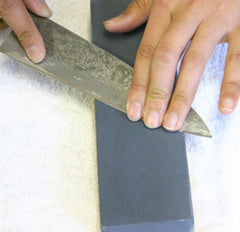
Next we sharpen the opposite side of the blade. Just as you did before, sharpen the knife keeping an angle of 10' to 15'. Push the point you want to sharpen with your first, second and third fingers. While keeping the angle and pushing the point with your fingers, stroke the blade until it reaches the other edge of the whetstone. Then pull the blade back until it reaches the edge of the whetstone. This back and forth is counted as one stroke. Repeat it for about five strokes until you can see or feel some small burrs (edge curvatures).. Then move the position of your fingers to where you have not sharpened yet, and repeat this five strokes of sharpening processed from the tip to the base of the blade. When your whetstone becomes dry, occational watering during sharpening process will also help and improve smooth sharpening.
Next we sharpen with a Nakato. Sharpening with a Nakato is exactly same as sharpening with as Arato. Please refer to the explanation and pictures above. Sharpening an Arato makes a good angle and sharpening with a Nakato makes the edge even sharper.
Sharpening with Shiageto for making finer and more detailed edge. Also the sharpening process with Shiageto makes better looks&finished.
After the Sharpening process with Shiageto, for removing the burr, we recommend to use newspapers (you put the edge on newspapers and repeat the motion (Moving the blade right to left, left to right while you put edge on newspapers.)
Hand washing the knife and keep it dry with clean cloth. This is the end of sharpening works.

(Step 1. you can check Above)
The method of Sharpening Single Bevel Edge is little bit different from sharpening double edge. But most of points are same, so you will get accustomed to sharpening quickly.

First we sharpen face side of blade. As you see the picture above, put knife's edge point (Circled part on picture) on whetstone.

Push the point you want to sharpen with your fingers. While keeping the angle and pushing the point with your fingers, stroke the blade until it reaches the other edge of the whetstone, then pull the blade back until it reaches the edge of the whetstone. This back and forth is counted as one stroke. Repeat it for about five strokes until you can see or feel some small burrs (edge curvatures) Then move the position of your fingers to where you have not sharpened yet, and repeat this five strokes of sharpening processed from the tip to the base of the blade.
After the Step 2, we now sharpen opposite flat side of the blade (with slightly concaved shape)
Put whole blade flat on whetstone as below picture.
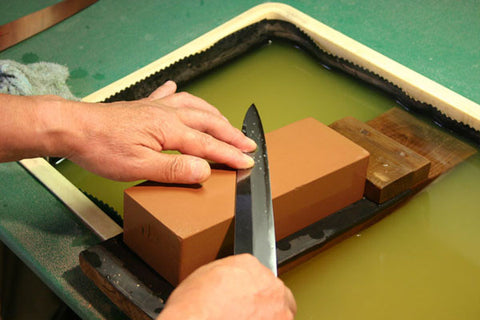
While pushing the the blade with your fingers, stroke the blade until it reaches the other edge of the whetstone, then pull the blade back until it reaches the edge of the whetstone. You can consider this sharpening process is removing the burrs on the edge (After Sharpening Face side of blade). Repeat this from the tip to the base of the blade.
Basically, there are 3 types of whetstones, Arato (rough grits), Nakato (medium grits) and Shiageto (fine grits). We normally use Nakato for the sharpening, but you can start with Arato to correct rough or damaged edge, and then Nakato and finish with Shiageto to get a fine and keen edge. All the sharpening methods and processes are same. However, it is not recommended to sharpen the opposite flat side of the blade with Arato
Here are the step by step methods he demonstrated us. Some other craftsmen may have their own ways of sharpening, but we believe this will be good example and will help you to get the good result of re-sharpening.

Sharpening with Arato for only face side of blade. Craftsman does not recommend to sharpen opposite side of blade with Rough Grit (Arato) whetstone.


Sharpening with Nakato for face side of blade, after then, sharpening opposite side of blade for removing the burr. Craftsman does this sharpening process with several kinds of Nakato (#800, #1000, #1200), before sharpening with Shiageto.


Sharpening with Shiageto for making finer and more detailed edge. Also the sharpening process with Shiageto makes better looks&finished.
After the Sharpening process with Shiageto, for removing the edge, we recommend to use newspapers (you put the edge on newspapers and repeat the motion (Moving the blade right to left, left to right while you put edge on newspapers.)
Hand washing the knife and keep it dry with clean cloth. This is the end of sharpening works.
We learned this method of sharpening from the experienced craftsman.


